
4.9 1890+ Google Reviews

Decks are an icon of outdoor living for many Americans. Sadly, the CPSC estimates that over 6000 people are injured every year due to failures in residential decks. Building a deck to code would prevent most of these injuries. Nevertheless, many homeowners can't resist the lure of building their own decks. There is nothing wrong with tackling your home projects as long as you take the time to look up building codes and minimum standards. With this in mind, we've compiled all the deck-building codes to keep you on track for your new deck.
Keep in mind that almost all jurisdictions require you to apply for a building permit to a build deck. Although some areas exclude some decks from needing a permit, this is rare. Likewise, you should contact your local building department to determine your specific requirements.
This means your construction project will require a final inspection from a local building inspector.
All codes mentioned are from the 2021 International Residential Code (2021 IRC). Your local codes may be different. For example, California requires guards to be at least 42" tall.
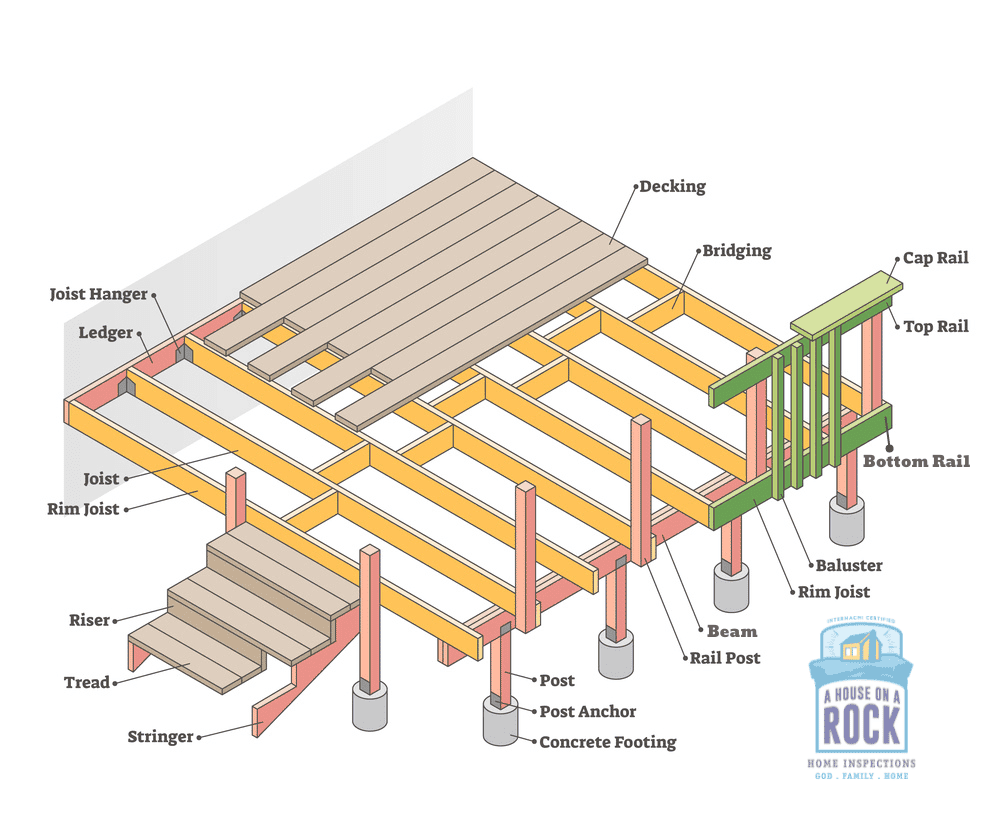
The first step in building a deck to code is getting familiar with the terminology.
Ledger Board: The ledger board is attached to the house and supports the end of the deck. Unfortunately, it is frequently attached improperly and is likewise the most common point of failure.
Deck Joist: Deck joists are the horizontal supports. Combined with the decking, these components make up the "floor" of the deck.
Rim Joist: Rim joists are simply joists on the outside of the deck.
Joist hanger: Joist hangers are the metal brackets that attach the joists to the ledger board.
Decking: Decking boards are installed perpendicular to the joists to make up the "floor" of the deck.
Footing: A footing in construction distributes a load over a larger ground area. Specifically for a deck, a footing distributes the post/column load over a larger area.
Deck Posts: The posts, also called columns, are the vertical supports. Specifically, they support the deck beams, which support the joists.
Deck Beams: The beams for the deck are the horizontal supports for the deck joists. Specifically, the joists may attach to the side of a beam with joist hangers or may bear directly on top of the beam.
Stair Stringer: Stair stringers are the stair-shaped boards that support the stairs.
Tread: Treads are the horizontal part of the stairs where you place your feet.
Riser: Stair risers are the vertical part of the stairs.
Guard/Guardrail: The deck guards consist of the top rail, bottom rail, and balusters. Their purpose is to prevent injuries from falling over the deck.
Live Load: Building codes refer to live load as the load imposed on the structure from occupancy. For example, people and furniture are considered part of the live load.
Dead Load: On the other hand, the dead load is the structure's load. For example, walls, windows, and finish material would be considered part of the dead load.
Frost Depth: This is the depth, determined by the local building code authority, that groundwater will freeze. Freezing soil can significantly impact a structure, so this must be taken into consideration when planning the foundation.
The first thing to consider when building a code-compliant deck is code-approved materials. For a wood deck, all of the lumber must be preservative treated. In addition, areas subject to termites must use termite protection. Luckily, modern preservative-treated wood is also already protected from termites.
Any cuts, notches, or holes that expose untreated areas of your deck components need treatment applied.
In addition, all fasteners and hardware need to be hot-dipped galvanized, zinc-coated galvanized, stainless steel, or other corrosion-resistant hardware.
A footing is the foundation component that is in contact with the soil. More specifically, it spreads the load of the foundation over a larger area of ground. As a result, footings add stability and prevent settlement.
Most codes require deck footings with a few exceptions.
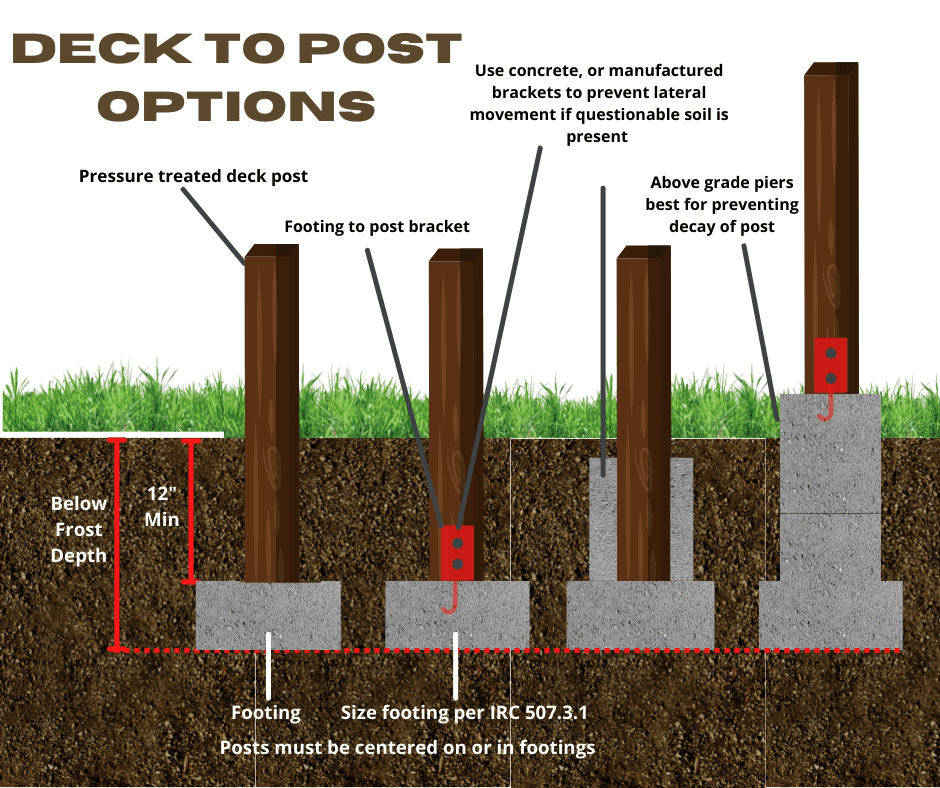
There are no situations where deck footings are allowed on top of the soil. Unfortunately, there is a common misconception that deck footings can be placed on top of the ground if it is a free-standing deck. The truth is that the footings don't need to be below the frost depth if it is a free-standing deck. However, the minimum depth for footings is 12 inches below the undisturbed soil, even if it's free-standing.
If you attach your deck to the house, the footings need to be below the frost depth. The frost depth here in Richmond is 18". Accordingly, you will need to look up the frost depth in your area to get the correct footing depth.
Check out this video to learn how to size your deck footings properly. Remember that you'll need to account for additional loads such as hot tubs.
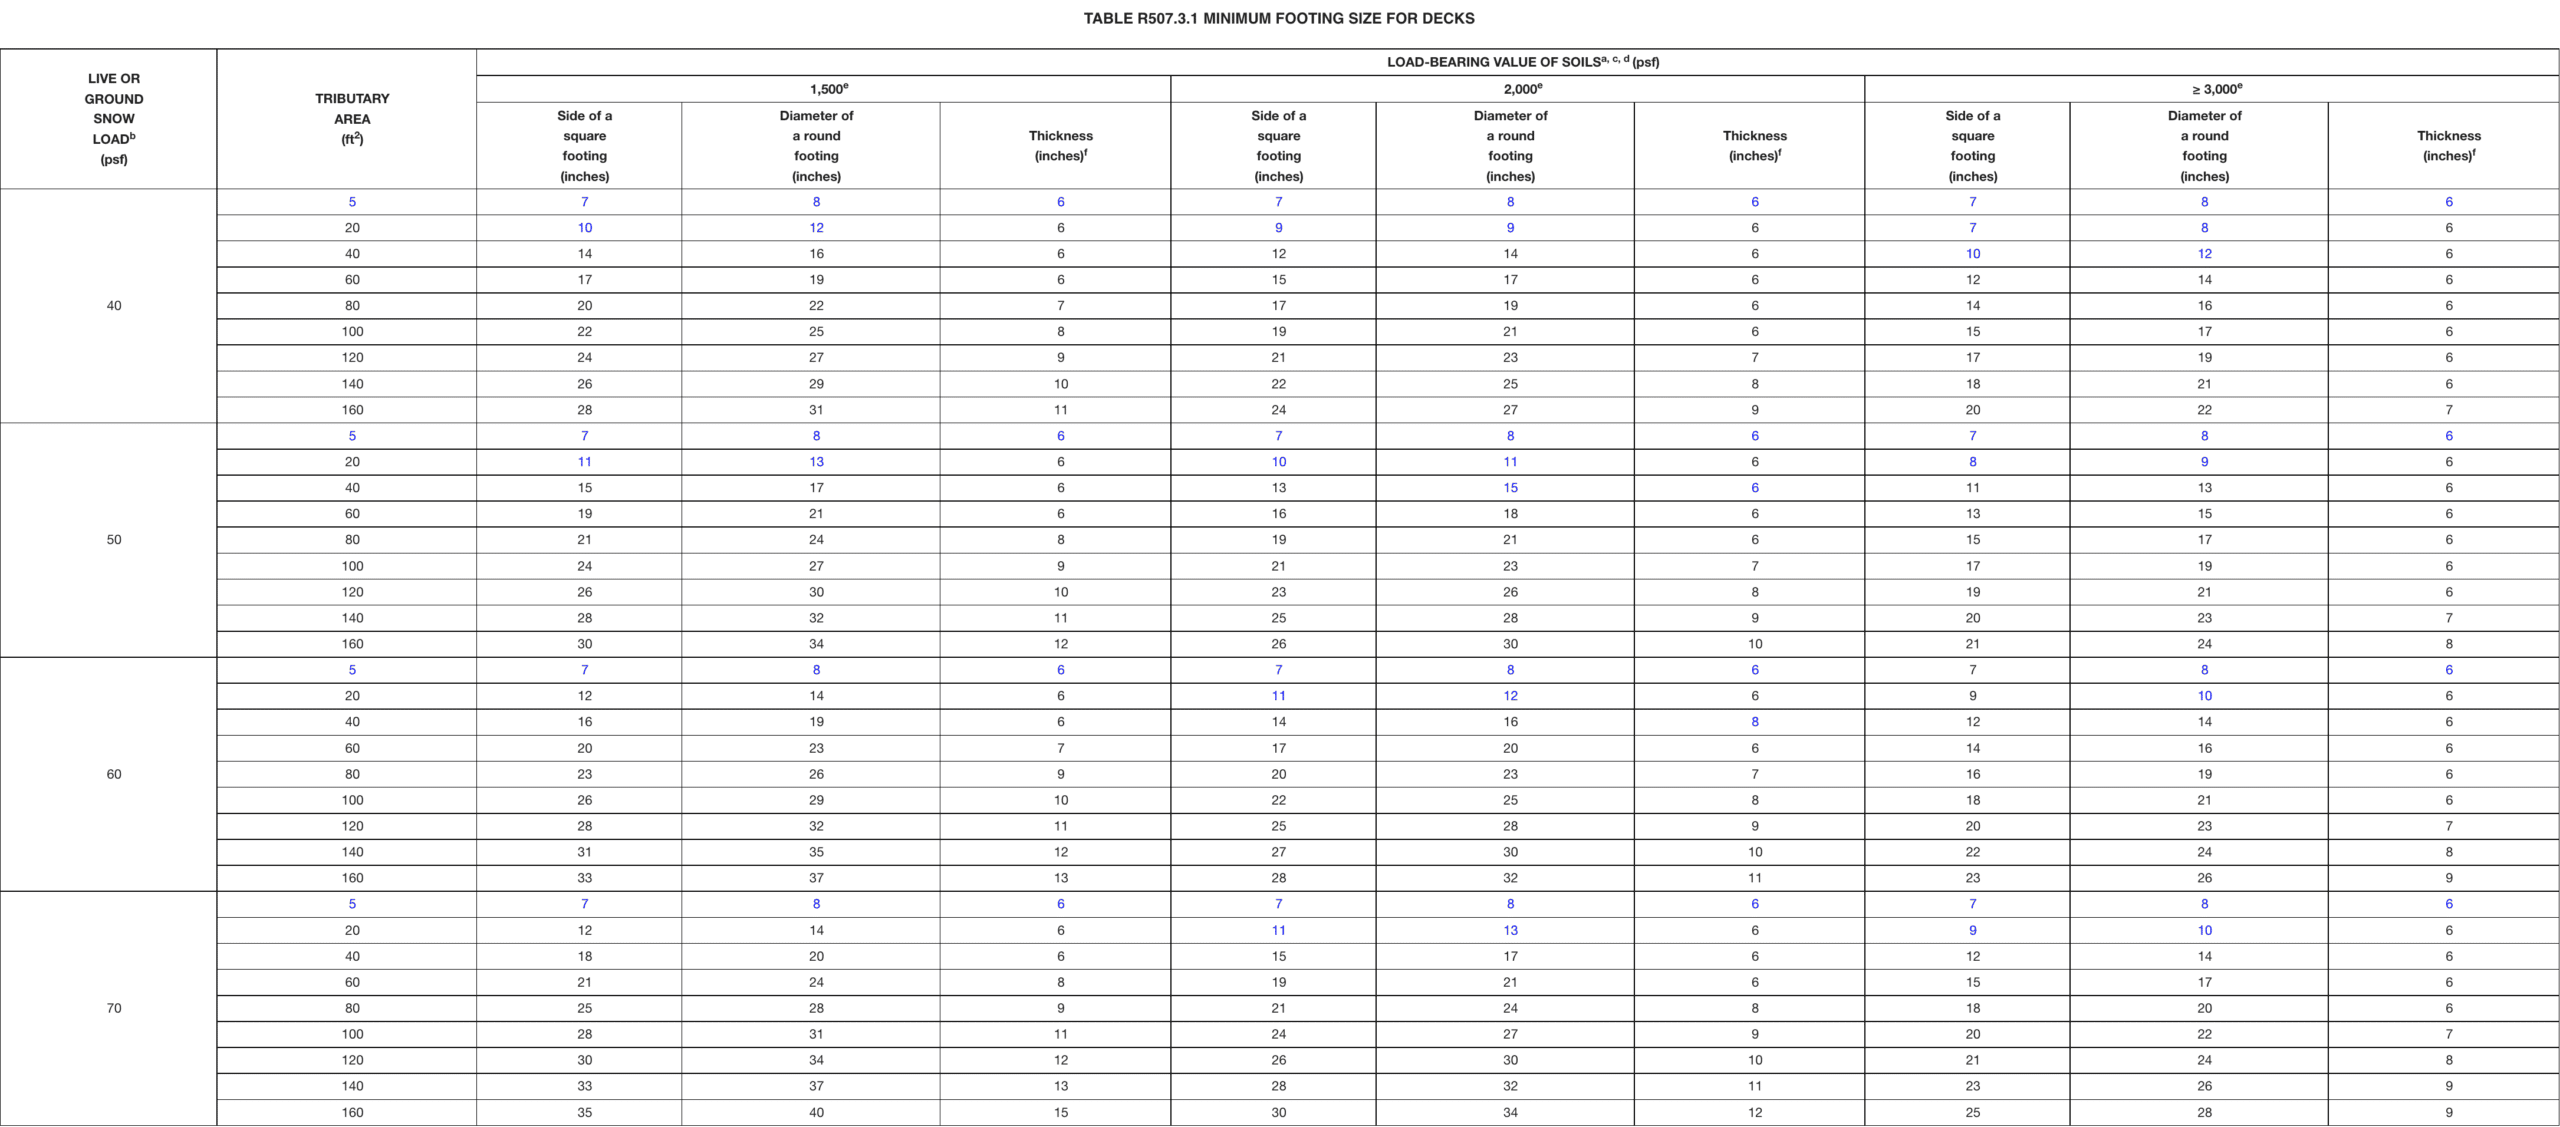
Deck posts transfer the deck's weight and live load to the footings. Most contractors use 4x4, 4x6, or 6x6 wood posts. To size your deck posts correctly to code, you need to know the live load or snow load, the species of the wood, the height of the post, and the tributary area.
You can use the chart below from the 2021 IRC.
Notice that for a load of 50 psf and a tributary area of 40sqft, the max height of a southern pine 4x4 post is 12'2". On the other hand, the max height of a redwood is 11'8".

There are three ways to connect posts to footings that prevent lateral movement.
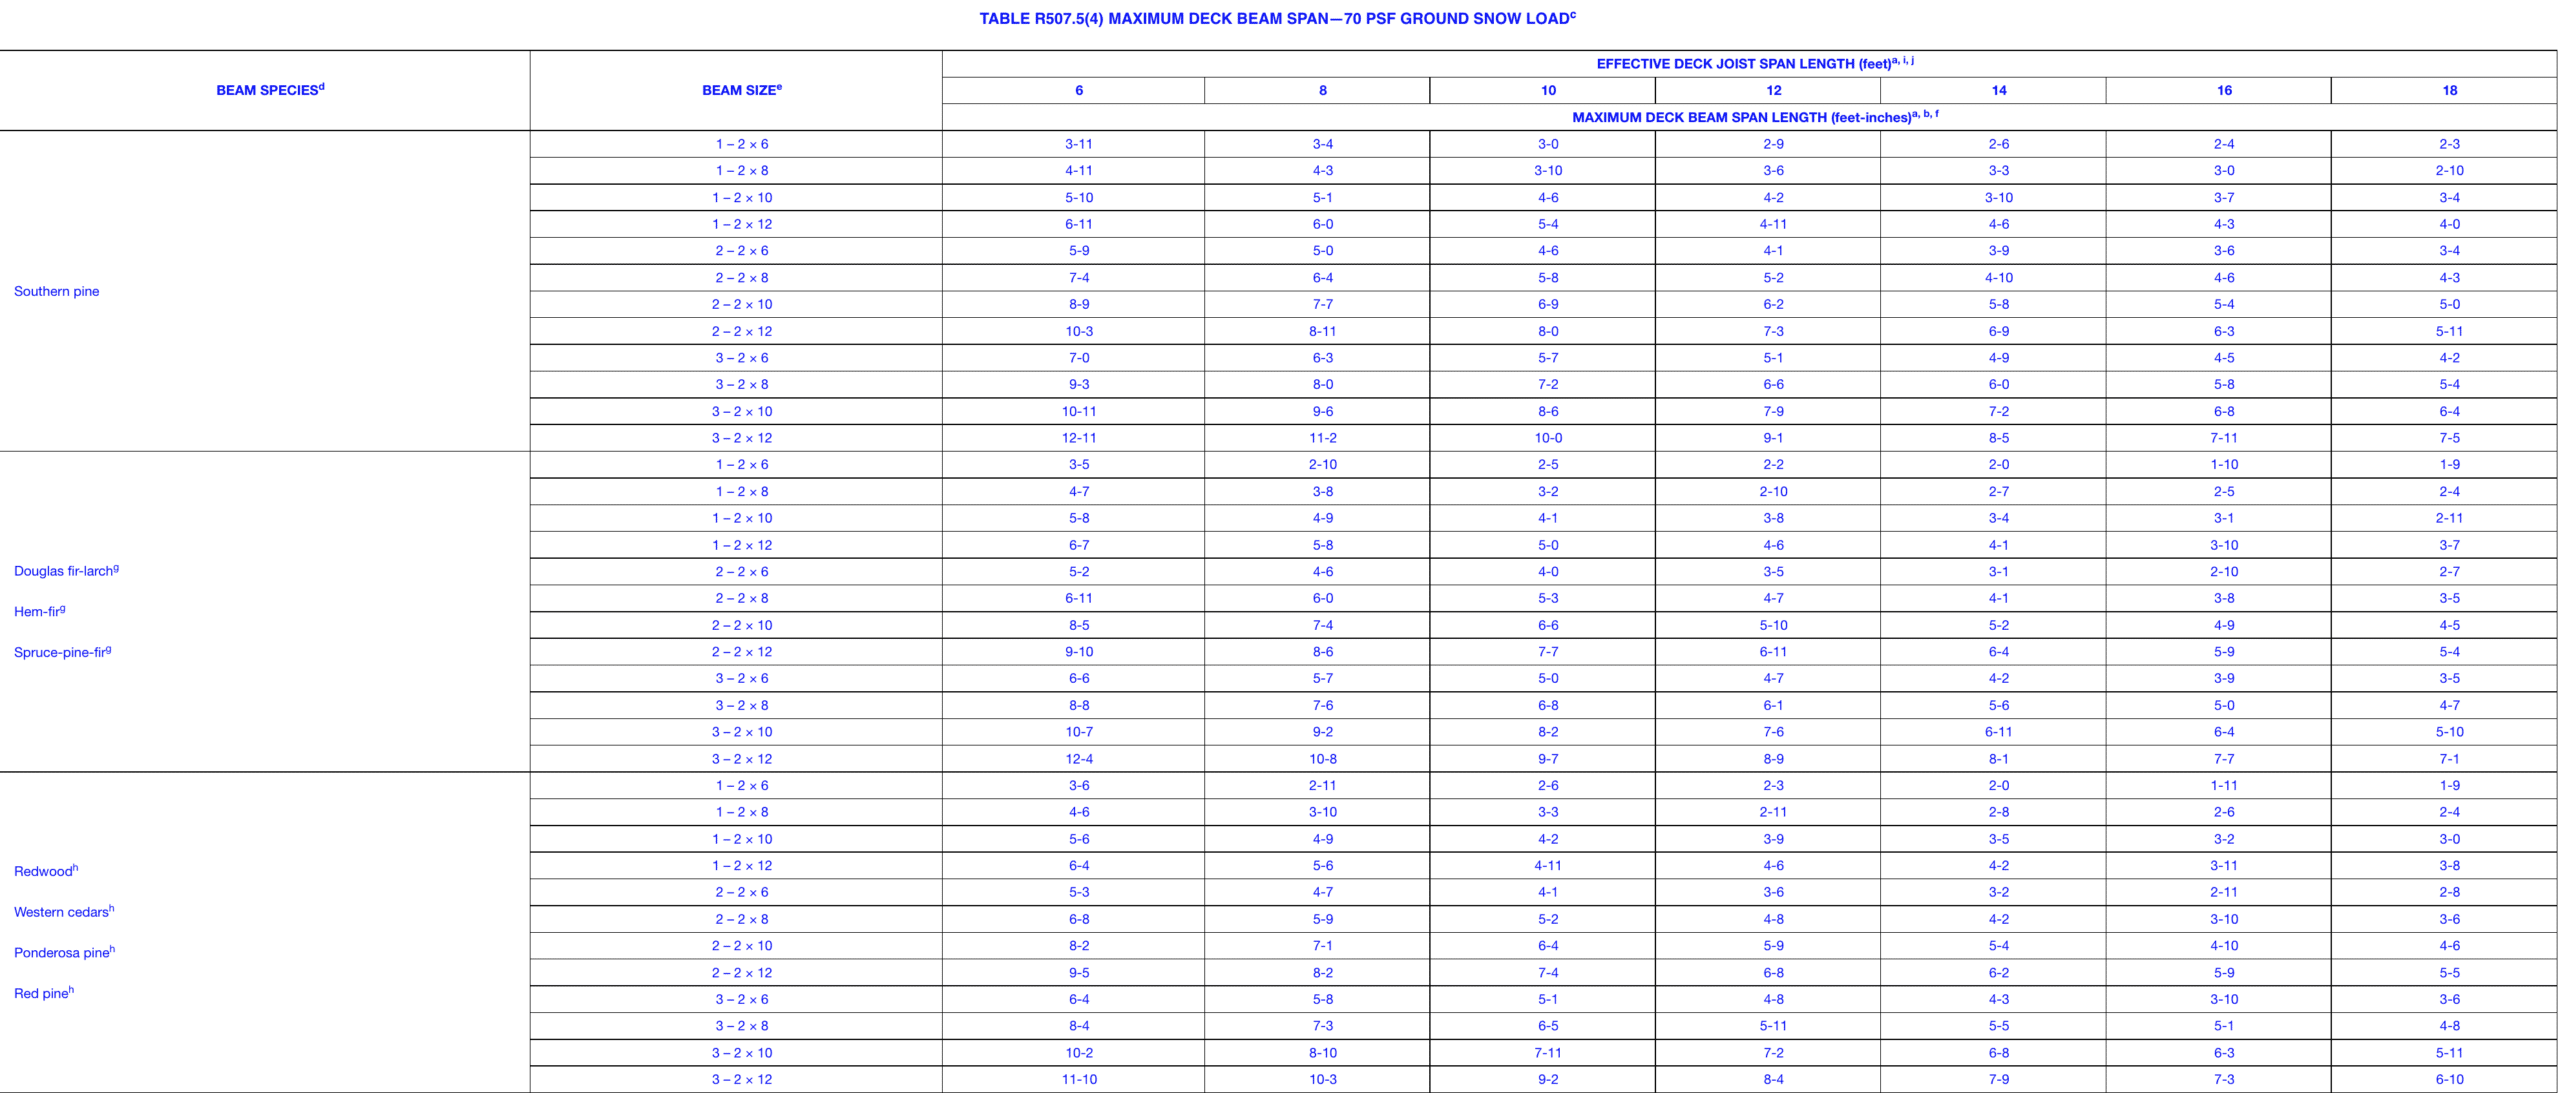
Deck beams transfer the deck's weight and live load to the posts. The span of the beam refers to the distance between the deck posts. To figure out your max span, you need to know the wood species, the depth of the beam, and the joist span. However, beams generally are not installed at max span. Remember that the farther apart your posts are, the larger the tributary area and the larger your footings will need to be.
It is better to plan for posts closer together and reference the chart to ensure you are within the maximum span.
Finally, when adding two pieces of wood together to create your beam, a minimum number of nails is required. The minimum nailing pattern is two rows of 10d (3-inch x 0.128-inch) nails minimum at 16 inches (406 mm) on center along each edge.
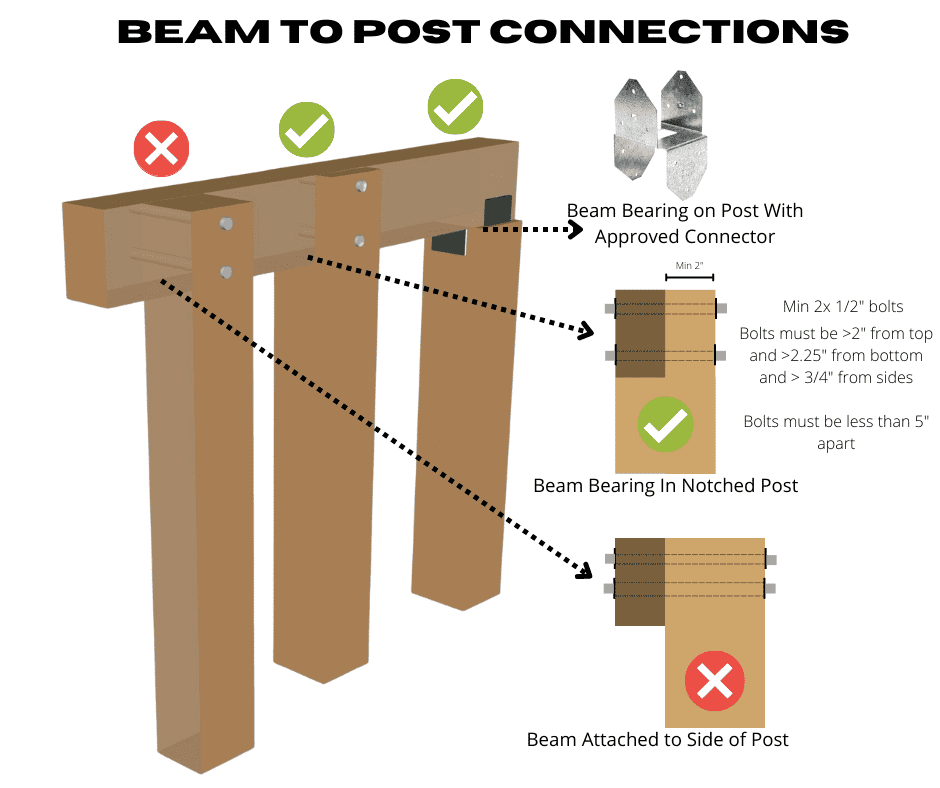
First, deck beams require at least 1.5" of bearing on wood or metal and at least 3 inches of bearing on masonry. Additionally, the entire width of the beam needs to be bearing on the posts. (This means that beams can not be bolted or nailed to the sides of the post).
Second, there needs to be a means to prevent the beam from moving from side to side. Nails alone are not sufficient for this purpose. If you notch a beam, as shown below, at least 2 1/2" bolts (with washers) are required to prevent side to side movement. On the other hand, special connectors are available for this purpose. Always follow the manufacturer's instructions when installing these connectors.
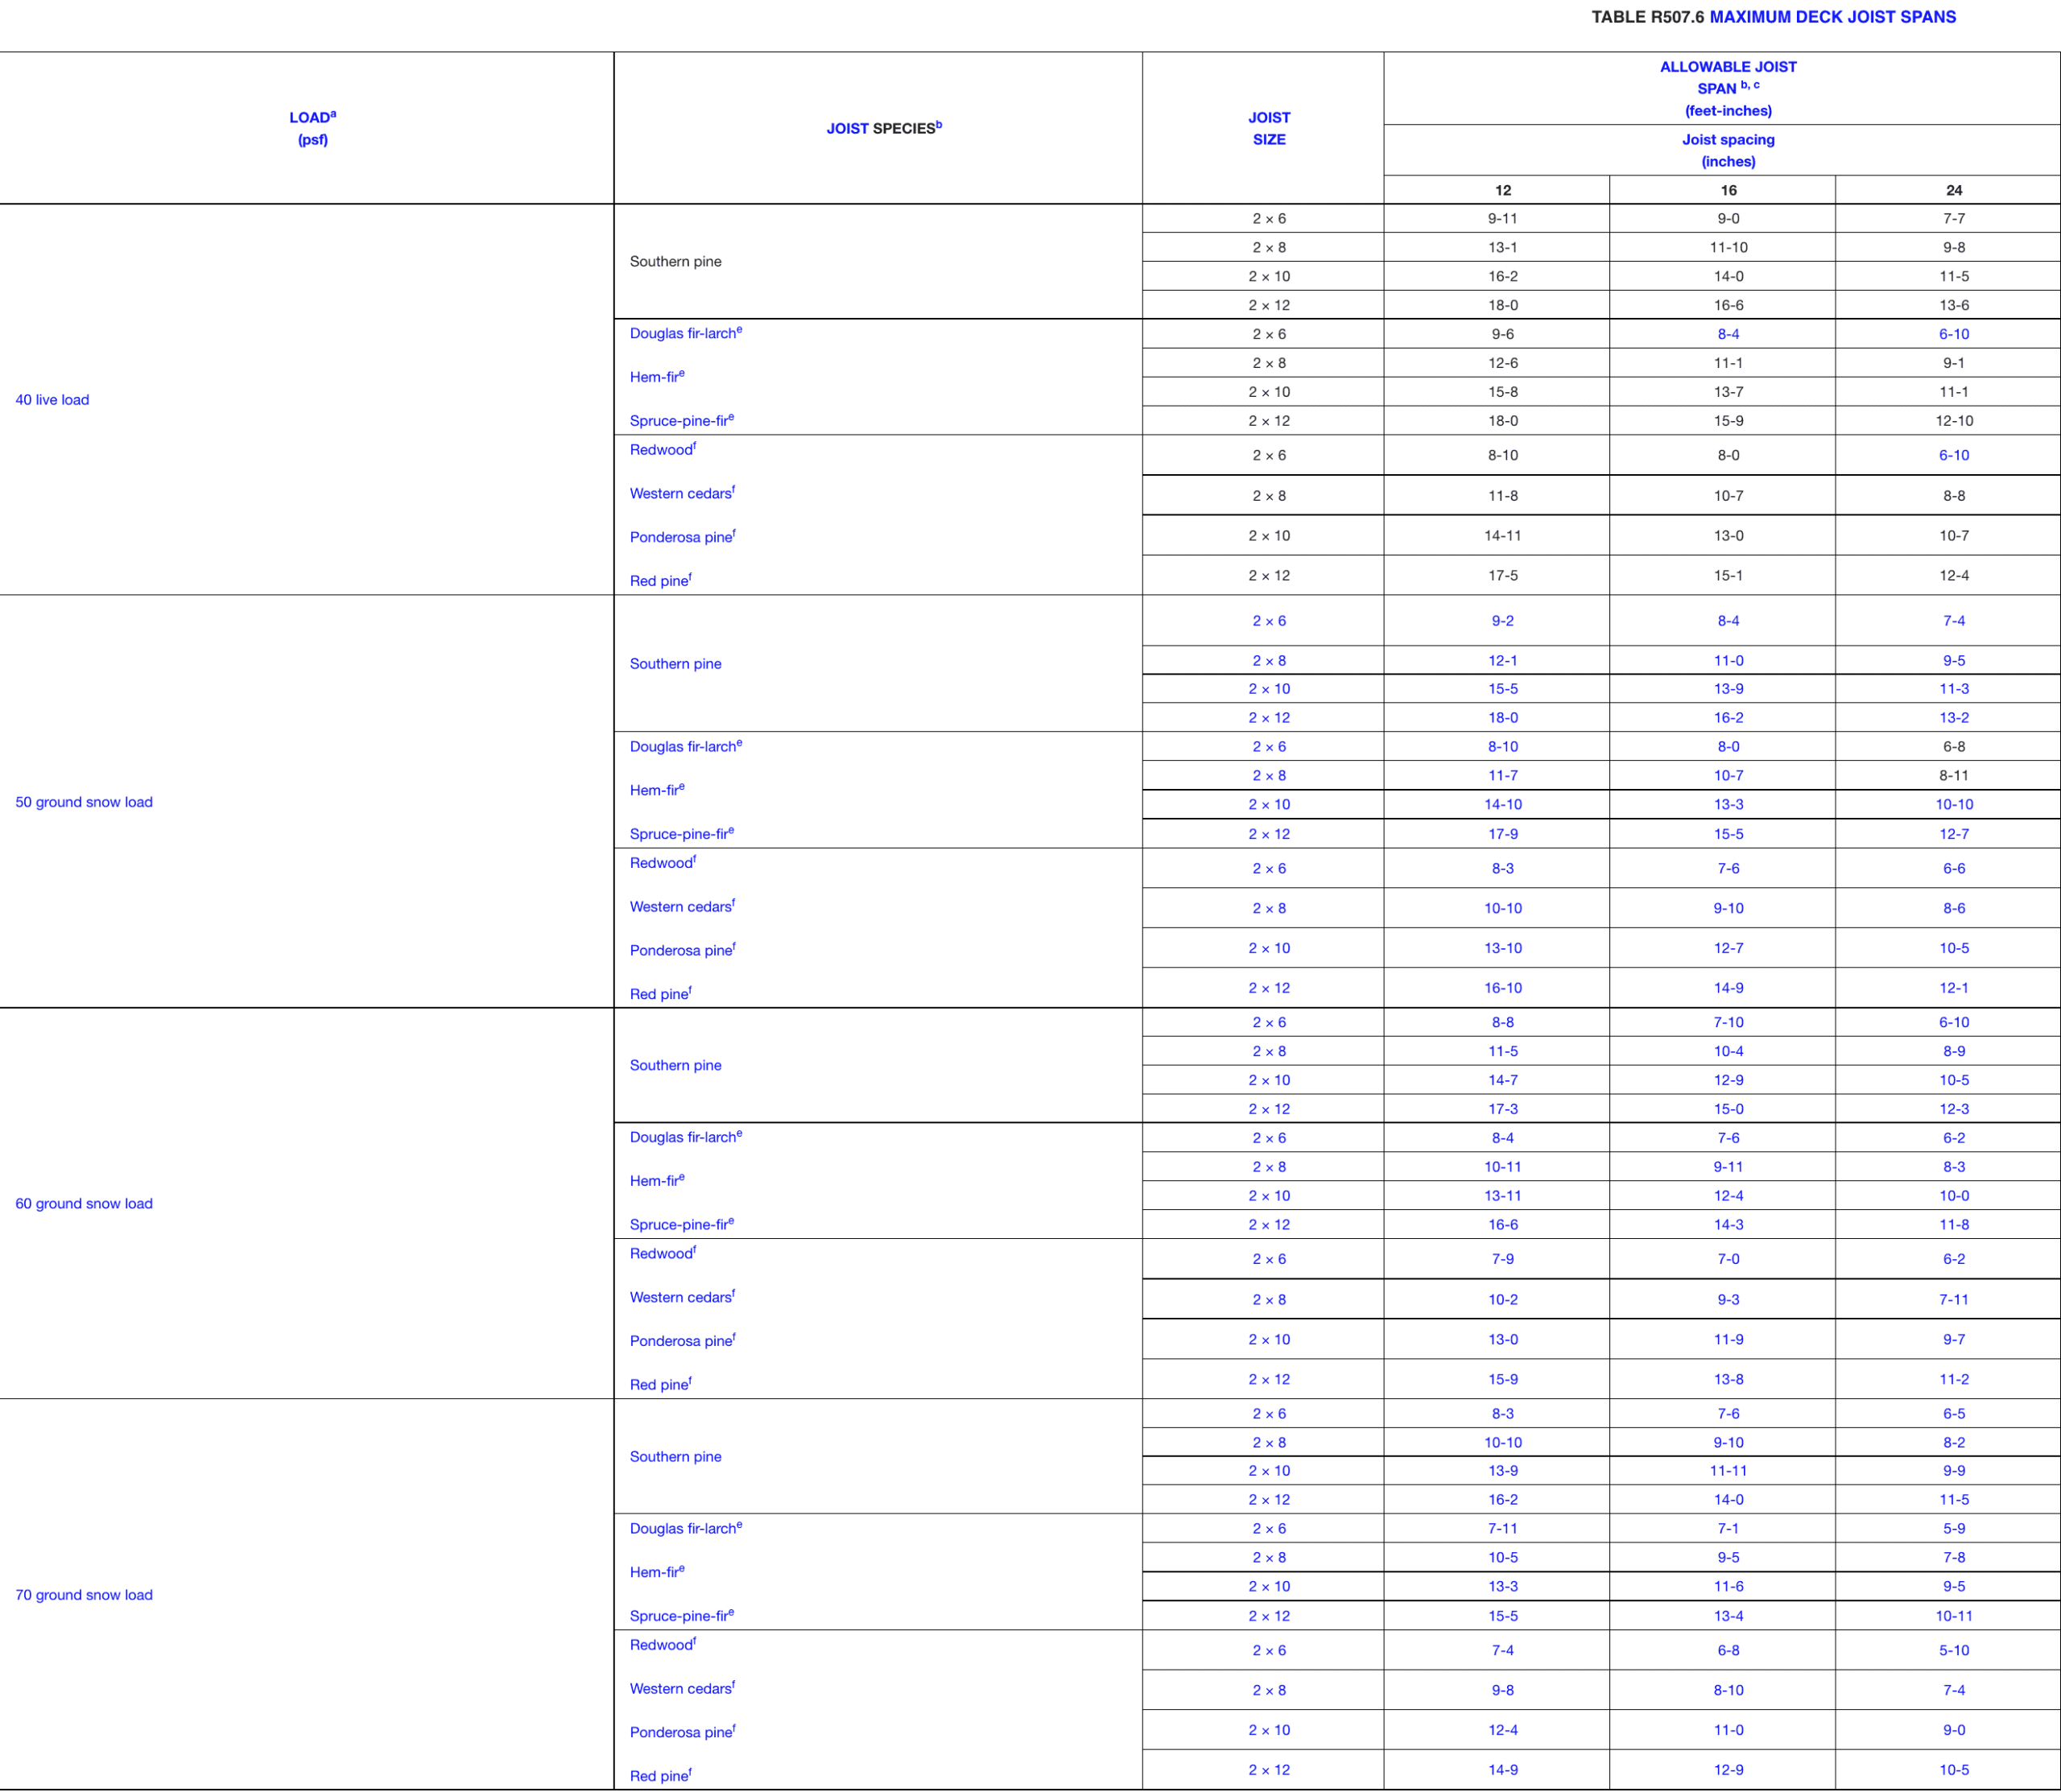
The deck joists transfer the weight of the decking and live load to the beams. Similar to the beams, there is a max span for joists. The span depends on the load, spacing of the joists, the depth of the joists, and the wood species.
Exceeding the max span would cause the joists to sag and crack.
Joists are traditionally spaced at 16" apart. However, if you plan to install diagonal deck boards, you should consider 12" spacing. As you will see in the next section, diagonal decking boards have a shorter span than perpendicular boards.
Use the chart below to determine the maximum joist span. For example, southern pine 2x10 joists, with a live load of 40psf, spaced 16" apart, can span 14 feet. If you were building a 15-foot deck attached to your house, you need at least two beam and post systems to accommodate that span.
The joists will be connected to the sides of the beams, the house ledger board, or be bearing directly on the beams.
If the joists are bearing directly on the house ledger board and beams, you need to the following number and type of nails. 4-8d box (21/2" × 0.113"); or 3-8d common (21/2" × 0.131"); or 3-10d box (3" × 0.128"); or3-3" × 0.131" nails.
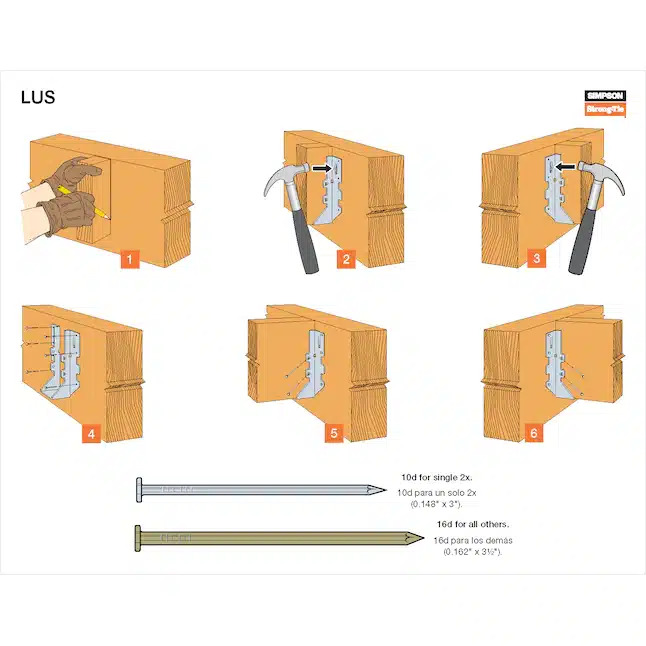
If the joists are attached to the sides of the beams and ledger board, you need to joist hangers. Keep in mind that there is specific hardware required for joist hangers. Always follow the manufacturer's instructions when using hangers and other connectors
This part is pretty simple. Decking boards are traditionally 1 1/4". However, if you opted for 24" joist spacing and want diagonal decking boards, you will need to use 2" thick decking boards.
The boards should be attached to each joist with two 8d nails or 8d wood screws. If you are using specialty screws, follow the manufacturer's instructions.
USE THIS DECKING BOARD CALCULATOR TO DETERMINE HOW MUCH MATERIAL YOU NEED.
The attachment to the house is where most builders and contractors fall short. Here in Richmond, contractors never flash decks correctly. Unfortunately, most builders, contractors, and county building inspectors don't understand this part of deck construction.
To properly attach a deck to the house, remove the siding from the area. Then, you attach the ledger board to the home. Keep in mind, the ledger board must be at least a 2x8. In addition, you must attach it to the band joist of the house. And like the rest of the deck components, the use a ledger board treated for termites and decay.
Next, you'll need to flash the ledger board prevent water from leaking into the band joist and rotting it out. Once the band joist rots, the deck will collapse, causing injuries and property damage. The siding and house wrap must overlap the ledger board, and the flashing should overlap the ledger board to make the connection waterproof. The image below illustrates proper deck flashing. NOTE: The home wrap goes over the flashing, and the flashing goes over the deck ledger. This creates a waterproof area.
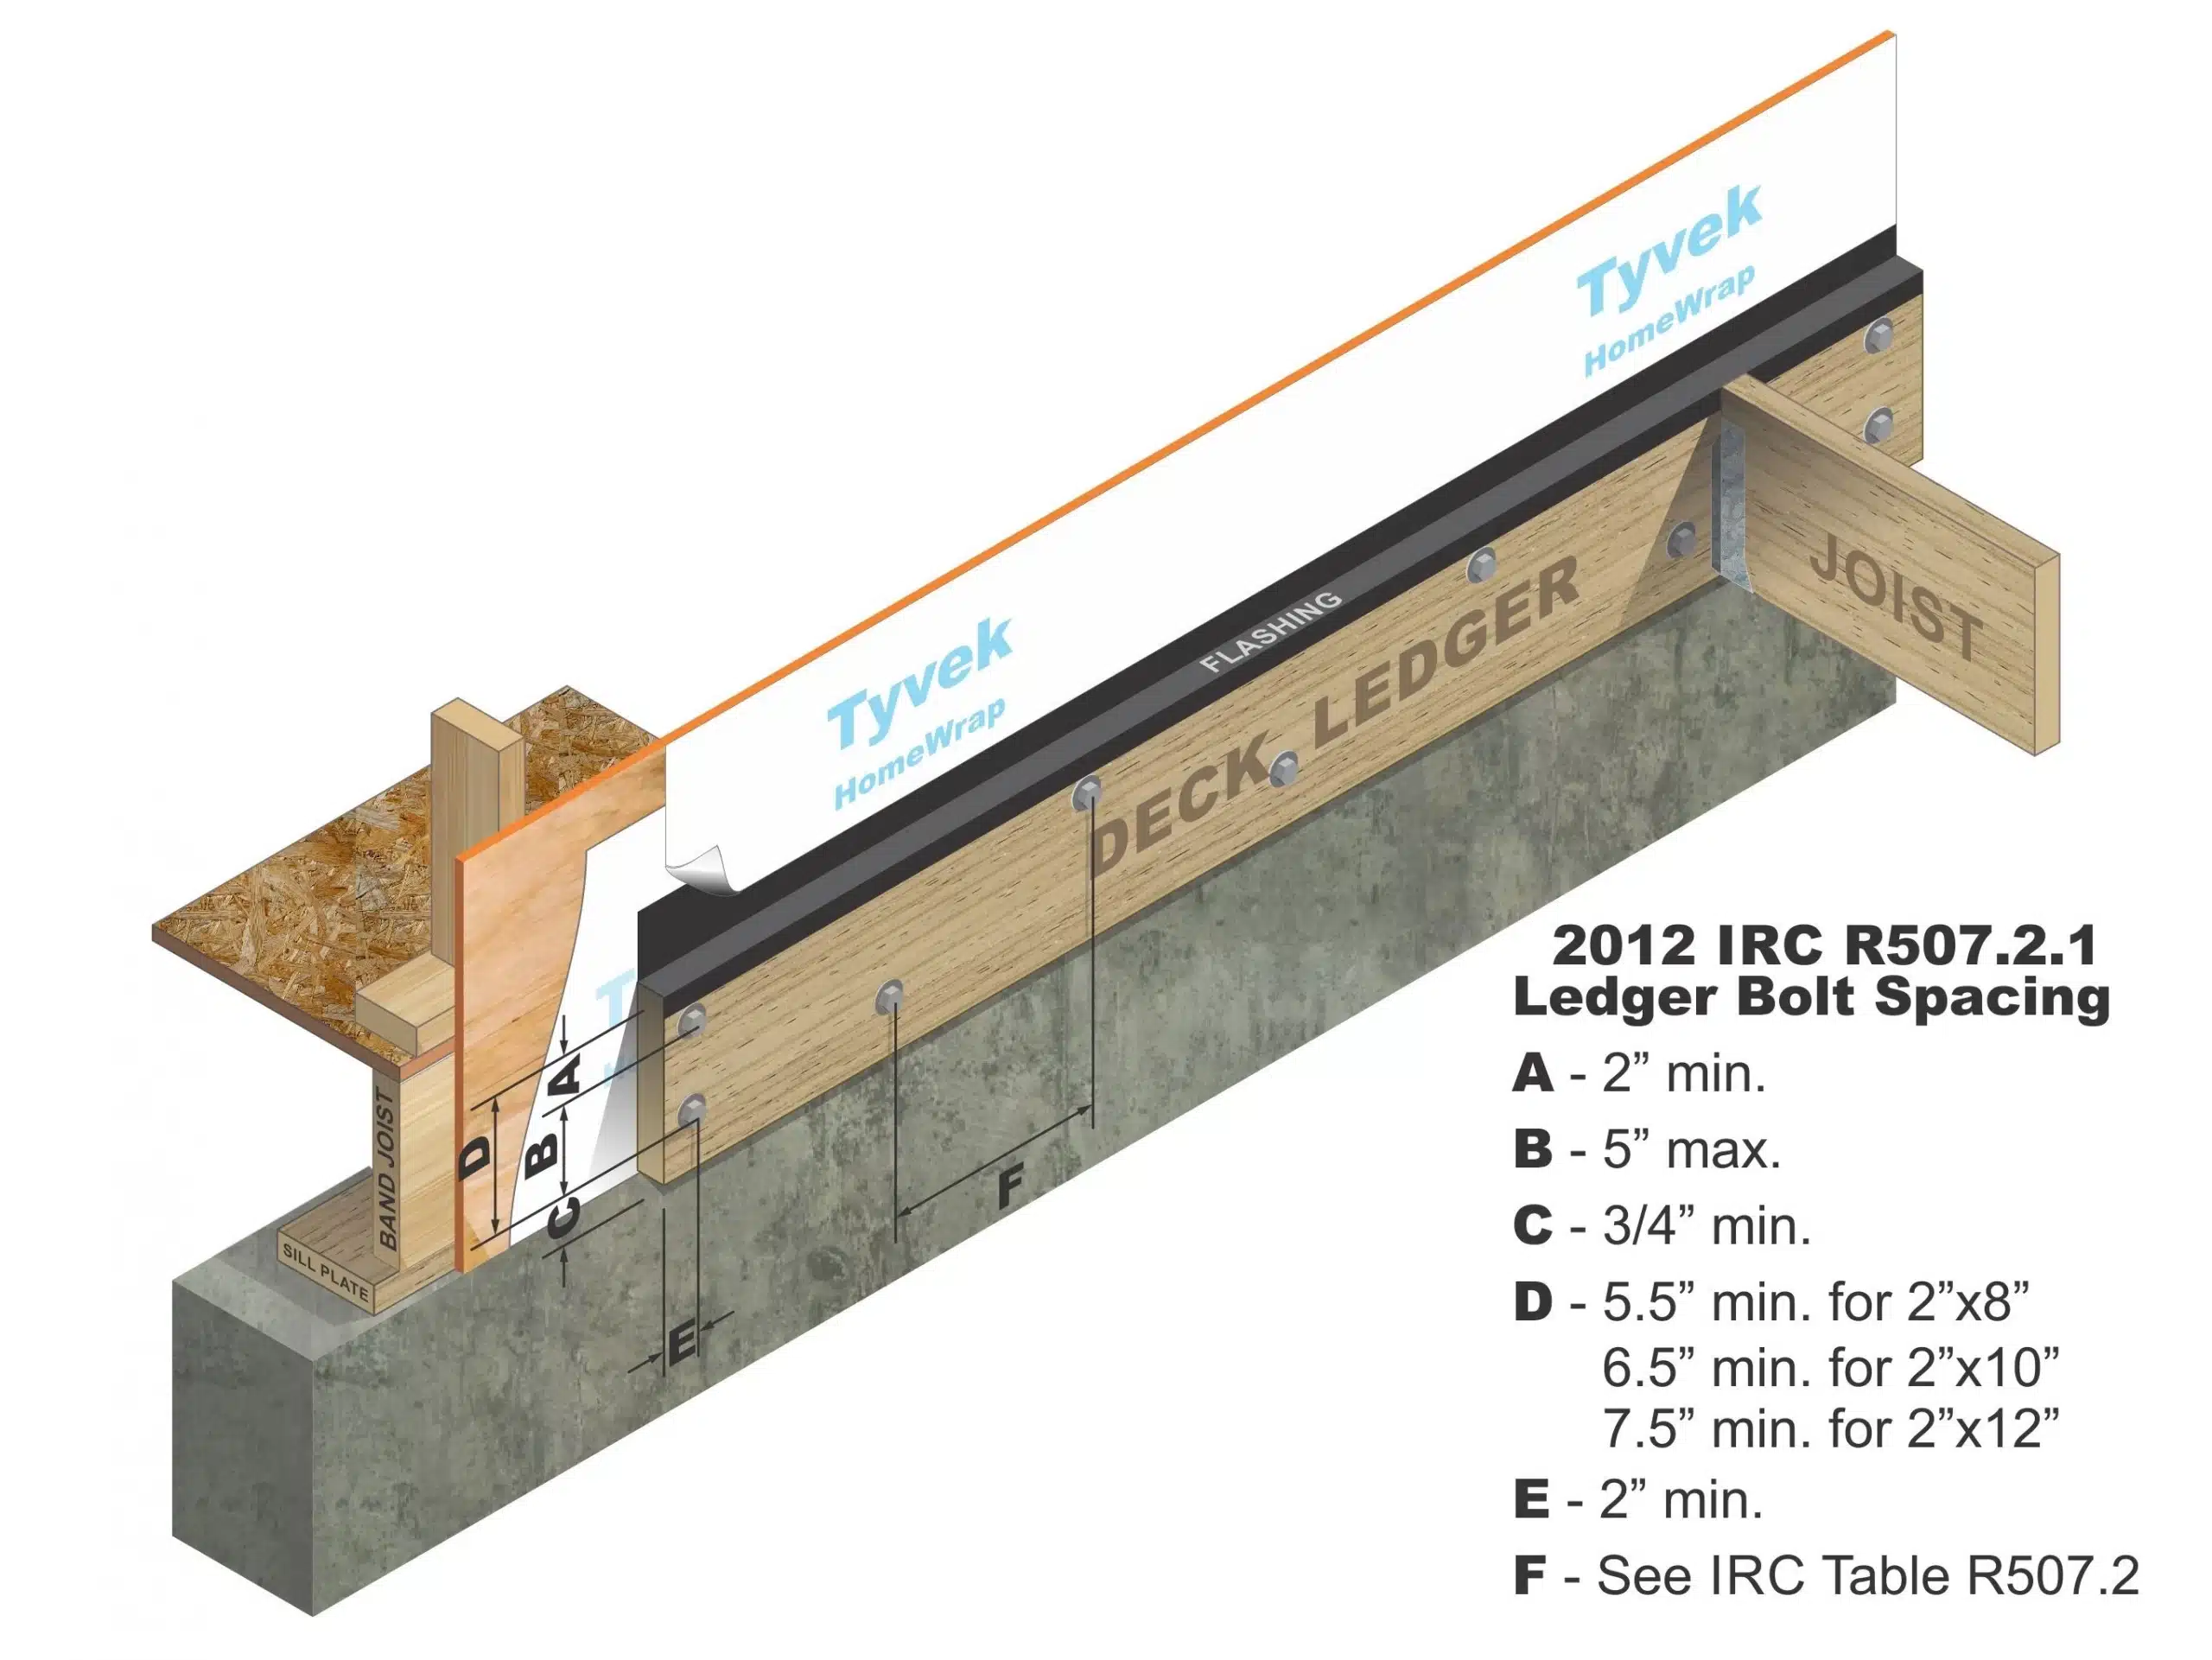
The next aspect of the attachment is what hardware and how many.
First, you can not install the ledger board with nails only. You have the option of 1/2" bolts, 1/2" lag screws, or proprietary hardware. Use the chart above for the spacing requirements of bolts and lag screws. NOTE: The bolts are going into the band joist. . Again, make sure you follow the manufacturer's instructions if you use specialized hardware.
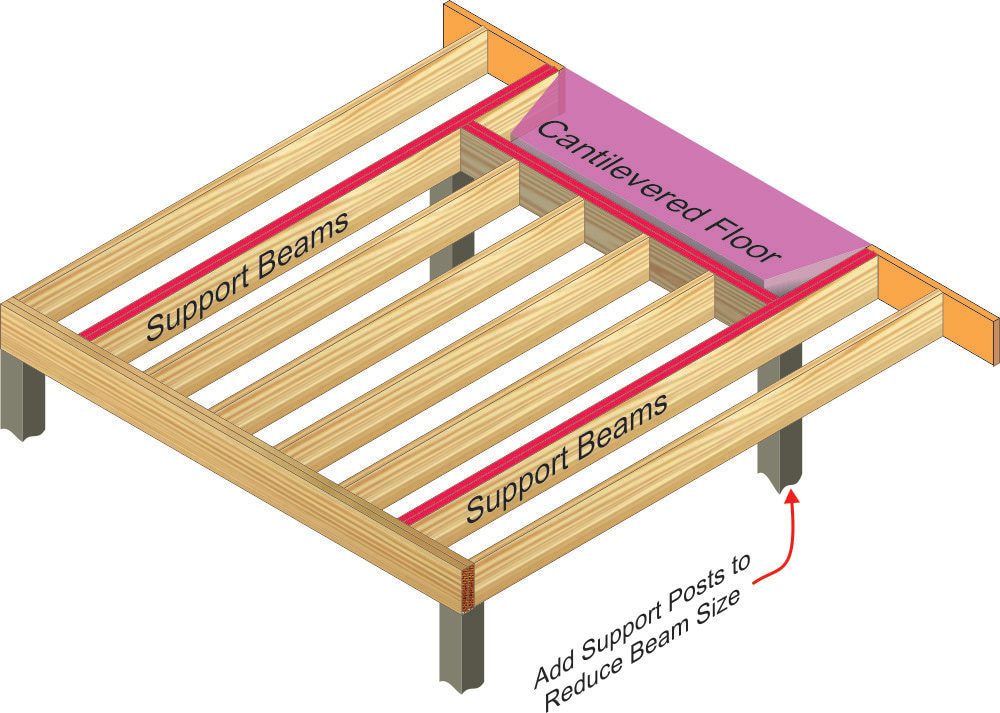
You can not attach the deck to a cantilevered floor. In short, a cantilevered floor has no direct support under one side. However, in the 80's and early 90's it was a trendy style to have cantilever floors. The photo below illustrates how to frame around the cantilevered floor. Notice the double joist on either side of the pink area, the beam that spans between them, and the posts to support the beam.
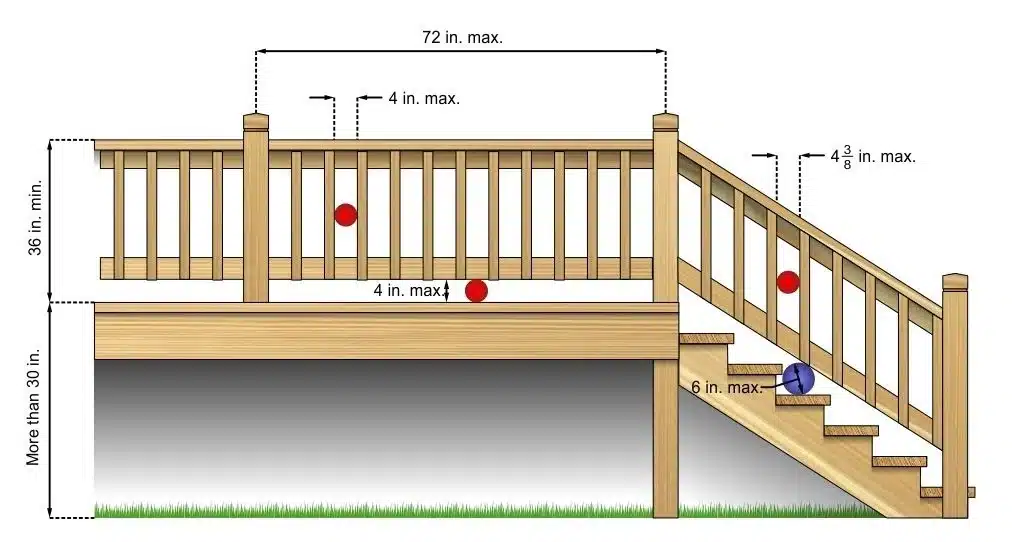
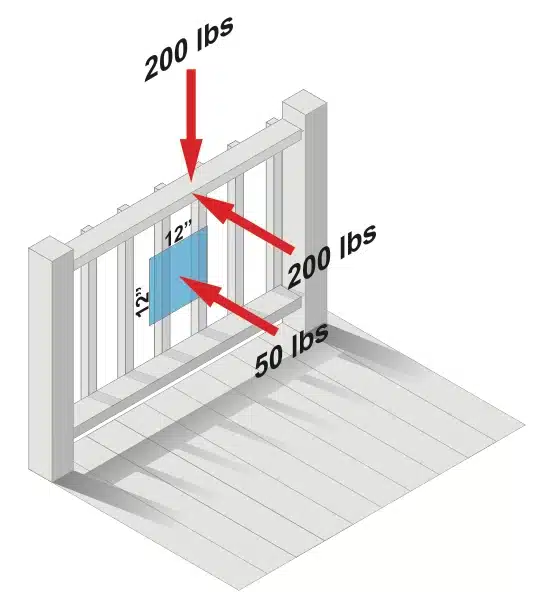
The last component of the deck you need to be aware of is the guardrails. Keep in mind that the "code" refers to guardrails as guards.
Building codes require guards on any area of the deck that is 30 inches or more above the ground. Moreover, there are several key requirements to be aware of when constructing your guards.
There you go. That should be everything you need to build a deck to code and get through the county inspections. If you see anything you think we missed, let me know!